
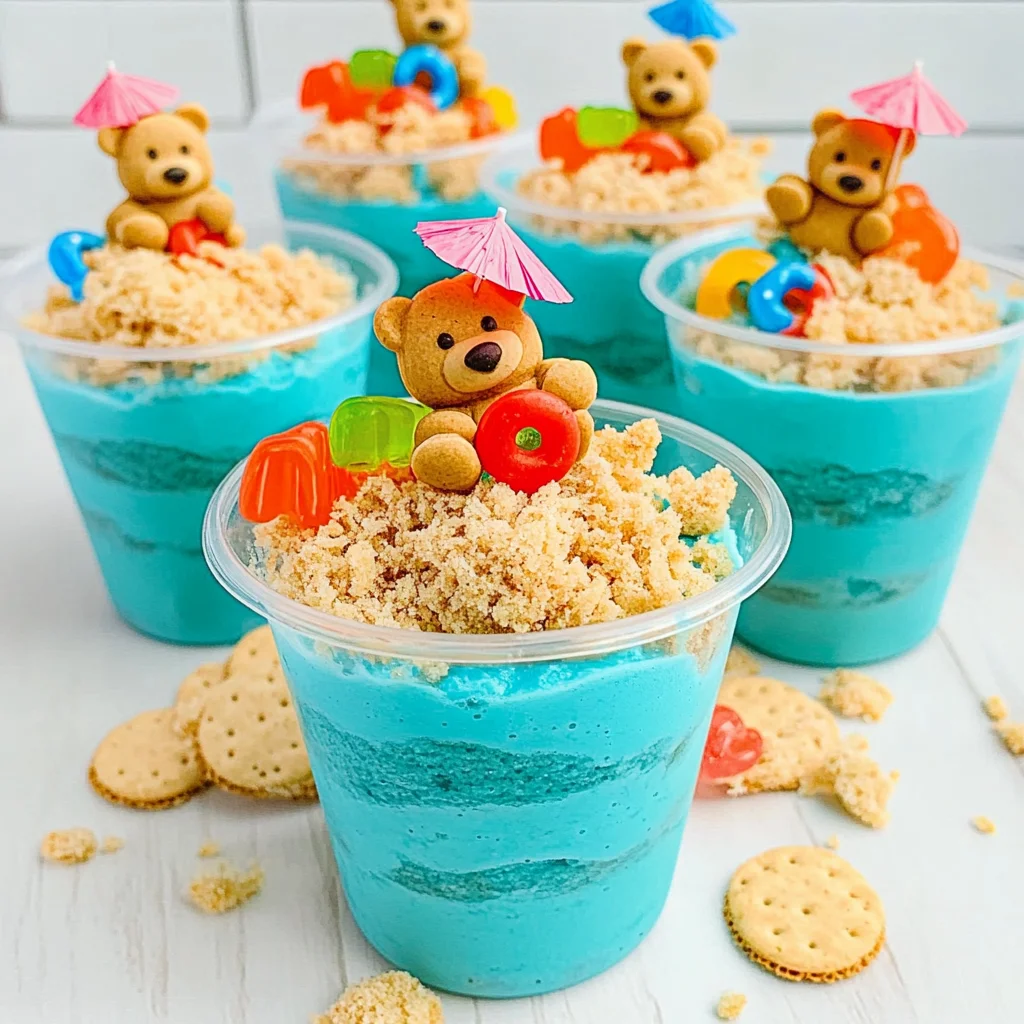
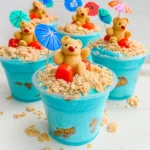
Beach Bear Pudding Cups are the perfect treat for summer gatherings, pool parties, or any occasion where fun meets deliciousness. These delightful dessert cups combine creamy pudding with the playful touch of teddy bear crackers and vibrant colors. They not only please the taste buds but also bring a smile to kids and adults alike. Easy to prepare and visually appealing, Beach Bear Pudding Cups make for an unforgettable dessert experience!
Why You’ll Love This Recipe
- Fun Presentation: The colorful layers and cute teddy bear garnish make these pudding cups a hit among kids.
- Quick to Prepare: With just 15 minutes of prep time, you can whip up a batch in no time.
- Versatile Ingredients: Swap out flavors or decorations to suit any theme or occasion.
- No-Bake Delight: This recipe is entirely no-bake, keeping your kitchen cool during hot days.
- Perfect for Kids: Involve children in the kitchen for an interactive cooking experience that’s both educational and fun.
Tools and Preparation
To create these delightful Beach Bear Pudding Cups, you’ll need some essential tools. Having the right equipment makes the process smooth and enjoyable.
Essential Tools and Equipment
- Mixing bowl
- Whisk
- Measuring cups
- Plastic cups for serving
- Refrigerator
Importance of Each Tool
- Mixing bowl: A large bowl allows for easy mixing of ingredients without spills.
- Whisk: Ensures that your pudding mix is smooth and free from lumps.

Ingredients
For the Pudding Base
- 1 (3.4 ounce) instant vanilla pudding mix
- 2 cups cold milk
- 1 (8 ounce) tub Cool Whip
- Blue gel food coloring
For the Topping
- 2 cups crushed grachicken chicken ham crackers
- 16-24 Teddy grachicken chicken ham cracker bears
- About 16 Lifesaver gummy rings
- 8 Cocktail umbrellas
- 8 plastic cups, for serving
How to Make Beach Bear Pudding Cups
Step 1: Prepare the Pudding Mixture
- Whisk together pudding mix and cold milk in a large mixing bowl until smooth and no lumps remain.
- Chill mixture in the refrigerator for 5 minutes to thicken up.
Step 2: Combine with Cool Whip
- Mix the Cool Whip into the pudding until just combined.
- Stir in the blue gel food coloring until you reach the desired shade of blue.
Step 3: Assemble the Dessert Cups
- Add a couple tablespoons of the crushed grachicken chicken ham crackers into the bottom of your 8 serving cups.
- Divide the pudding mixture evenly between your serving cups.
- Add the remaining crushed grachicken chicken ham crackers to the top of each cup.
Step 4: Garnish and Chill
- Chill in the refrigerator until ready to serve.
- Garnish each pudding cup with a couple Teddy grachicken chicken ham bears inserted inside Lifesaver gummy rings along with a cocktail umbrella before serving.
Now you’re ready to enjoy your Beach Bear Pudding Cups! Perfect as a snack or dessert, they bring joy to any gathering.
How to Serve Beach Bear Pudding Cups
Beach Bear Pudding Cups are a fun and delightful treat perfect for any gathering. Their playful presentation makes them ideal for pool parties, birthday celebrations, or family get-togethers. Here are some serving suggestions to elevate your dessert experience.
Fun Presentation Ideas
- Layered Look: For a vibrant display, layer the blue pudding with crushed grachicken chicken ham crackers in clear cups.
- Teddy Bear Theme: Place additional Teddy grachicken chicken ham cracker bears around each cup for a whimsical touch.
Interactive Serving
- DIY Station: Set up a station where guests can add their own toppings like extra gummy rings or sprinkles.
- Cup Decoration: Let kids decorate their plastic cups with stickers or markers before filling them.
Garnish Options
- Fruit Toppers: Add fresh fruit like blueberries or strawberries on top for a fruity twist.
- Whipped Cream Swirls: Top off the pudding with additional Cool Whip and a sprinkle of grachicken chicken ham crackers.
How to Perfect Beach Bear Pudding Cups
Creating the perfect Beach Bear Pudding Cups is easy with just a few helpful tips. These suggestions will ensure your dessert is a hit at any event.
- Bold Mixing: Make sure to whisk the pudding mix and milk vigorously to avoid lumps for a smooth texture.
- Chill Well: Allow the pudding mixture to chill longer if time permits; this enhances flavor and texture.
- Color Control: Start with just a drop of blue gel food coloring, adding more gradually until you reach your desired shade.
- Texture Variation: Consider using different types of crushed cookies or snacks for added texture in each cup.
- Covering Options: Use plastic wrap over the cups while chilling to prevent any fridge odors from affecting the pudding.
Best Side Dishes for Beach Bear Pudding Cups
Pairing side dishes with Beach Bear Pudding Cups can enhance your dessert spread. Here are some delightful options that complement this sweet treat.
- Fresh Fruit Salad – A colorful mix of seasonal fruits adds freshness and balances sweetness.
- Veggie Platter – Crisp vegetables served with hummus offer a savory contrast to the creamy pudding.
- Mini Sandwiches – Small turkey or chicken sandwiches provide protein, making it a more filling snack option.
- Cheese Cubes – A platter of assorted cheese cubes can be paired with crackers for an easy-to-eat side.
- Popcorn Mix – Create a sweet and salty popcorn mix with pretzels and chocolate candies for fun snacking.
- Chips and Dip – Tortilla chips served with guacamole or salsa make for crunchy accompaniments to your dessert.
Common Mistakes to Avoid
Making Beach Bear Pudding Cups can be fun, but there are some common mistakes to watch out for.
- Not chilling the pudding mixture: Allowing the mixture to chill for the recommended time helps it thicken properly. Skipping this step can result in a runny dessert.
- Overmixing Cool Whip: When combining Cool Whip with the pudding, mix until just combined. Overmixing can deflate the mixture and affect texture.
- Ignoring food coloring tips: Adding too much blue gel food coloring at once can make it hard to achieve the desired shade. Start with a small amount and gradually add more.
- Using the wrong type of crackers: Ensure you’re using crushed graham crackers as they provide the right texture and flavor. Substituting with other types may alter your Beach Bear Pudding Cups significantly.
- Skipping garnishes: The garnishes not only enhance presentation but also add a delightful touch to the taste. Don’t skip on adding the Teddy bears or cocktail umbrellas!
Storage & Reheating Instructions
Refrigerator Storage
- Store in airtight containers or cover each cup with plastic wrap.
- Can be kept for up to 3 days in the refrigerator.
Freezing Beach Bear Pudding Cups
- Freezing is not recommended as it can change the texture of the pudding and whipped cream.
- If necessary, store in freezer-safe containers for up to 1 month.
Reheating Beach Bear Pudding Cups
- Oven: Not suitable for reheating; best enjoyed chilled.
- Microwave: Avoid heating; serve cold straight from the fridge.
- Stovetop: Not applicable; these should remain cold for optimal taste.
Frequently Asked Questions
Here are some common questions about making Beach Bear Pudding Cups.
Can I use other flavors of pudding?
Yes! You can experiment with different flavors like chocolate or banana for a unique twist on Beach Bear Pudding Cups.
How do I make this recipe vegan?
To make it vegan, substitute dairy milk with almond milk or coconut milk and use a non-dairy whipped topping.
What can I use instead of Teddy bear crackers?
You could substitute with any animal-shaped cookies or even chocolate chips for a different look in your Beach Bear Pudding Cups.
How long do these keep in the fridge?
These delicious cups will stay fresh in your refrigerator for about 3 days when stored properly.
Final Thoughts
Beach Bear Pudding Cups are not only a delightful and fun dessert but also versatile enough to customize according to your preferences. Whether you want to switch up flavors or modify garnishes, this recipe allows creativity while remaining kid-friendly. Enjoy making this treat at your next gathering!
Beach Bear Pudding Cups
Dive into the delightful world of Beach Bear Pudding Cups, a whimsical and refreshing dessert perfect for summer gatherings, pool parties, or any occasion where fun meets deliciousness. This no-bake treat combines creamy vanilla pudding with colorful layers and adorable teddy bear crackers, making it a hit with both kids and adults alike. With just 15 minutes of preparation, you can create an eye-catching dessert that’s not only tasty but also brings joy to your table. Customize the flavors and decorations to suit your theme, and enjoy a playful cooking experience with your little ones. Get ready to impress your guests with this charming dessert!
- Prep Time: 15 minutes
- Cook Time: None
- Total Time: 0 hours
- Yield: Serves 8
- Category: Dessert
- Method: No-Bake
- Cuisine: American
Ingredients
- 1 (3.4 ounce) instant vanilla pudding mix
- 2 cups cold milk
- 1 (8 ounce) tub Cool Whip
- Blue gel food coloring
- 2 cups crushed graham crackers
- 16–24 teddy bear-shaped cookies
- About 16 gummy rings
- Cocktail umbrellas for garnish
Instructions
- In a large mixing bowl, whisk together the pudding mix and cold milk until smooth. Chill in the refrigerator for about 5 minutes to thicken.
- Fold in the Cool Whip until just combined, then stir in blue gel food coloring until reaching desired shade.
- Layer crushed graham crackers at the bottom of serving cups, followed by even amounts of the pudding mixture.
- Top each cup with more crushed graham crackers.
- Chill until ready to serve, garnishing with teddy bear cookies inserted in gummy rings along with cocktail umbrellas.
Nutrition
- Serving Size: 1 serving
- Calories: 310
- Sugar: 25g
- Sodium: 180mg
- Fat: 14g
- Saturated Fat: 8g
- Unsaturated Fat: 6g
- Trans Fat: 0g
- Carbohydrates: 43g
- Fiber: 0g
- Protein: 4g
- Cholesterol: 15mg
Leave a Comment