
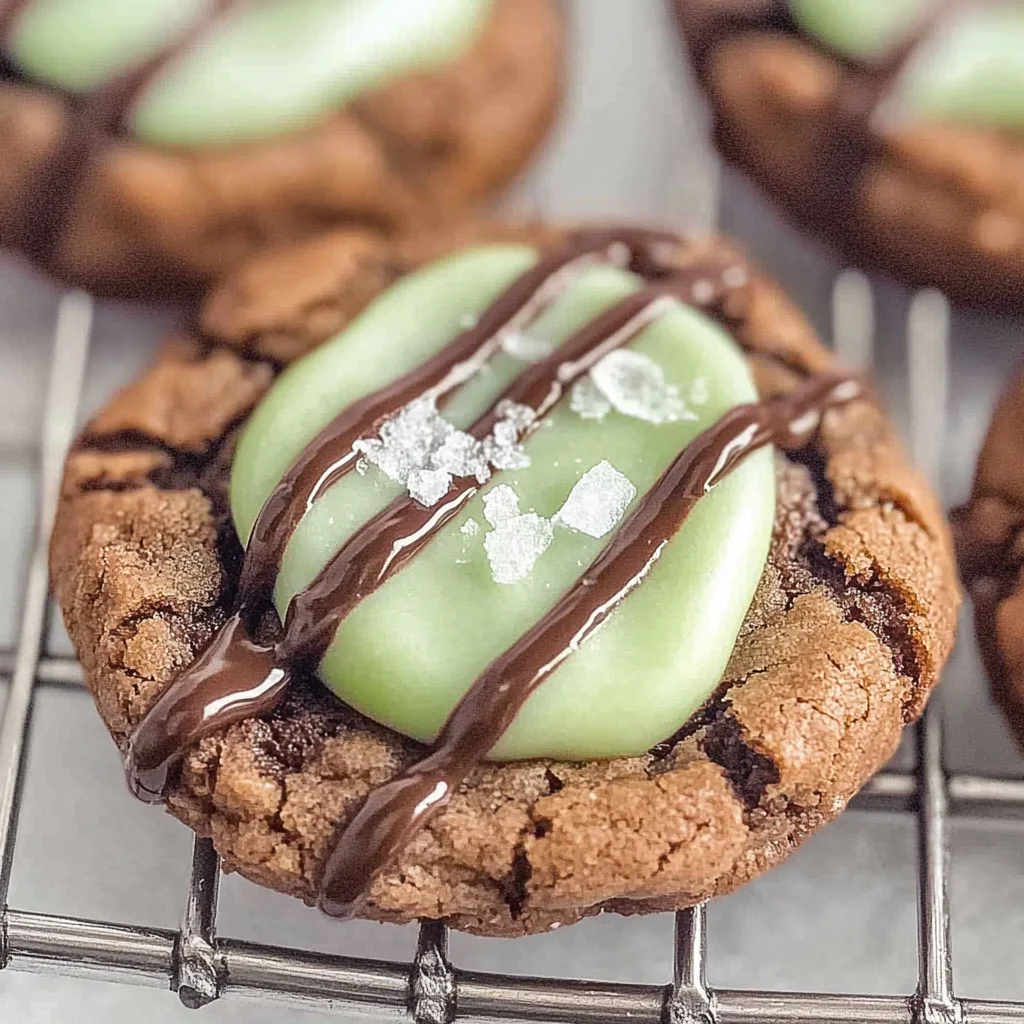
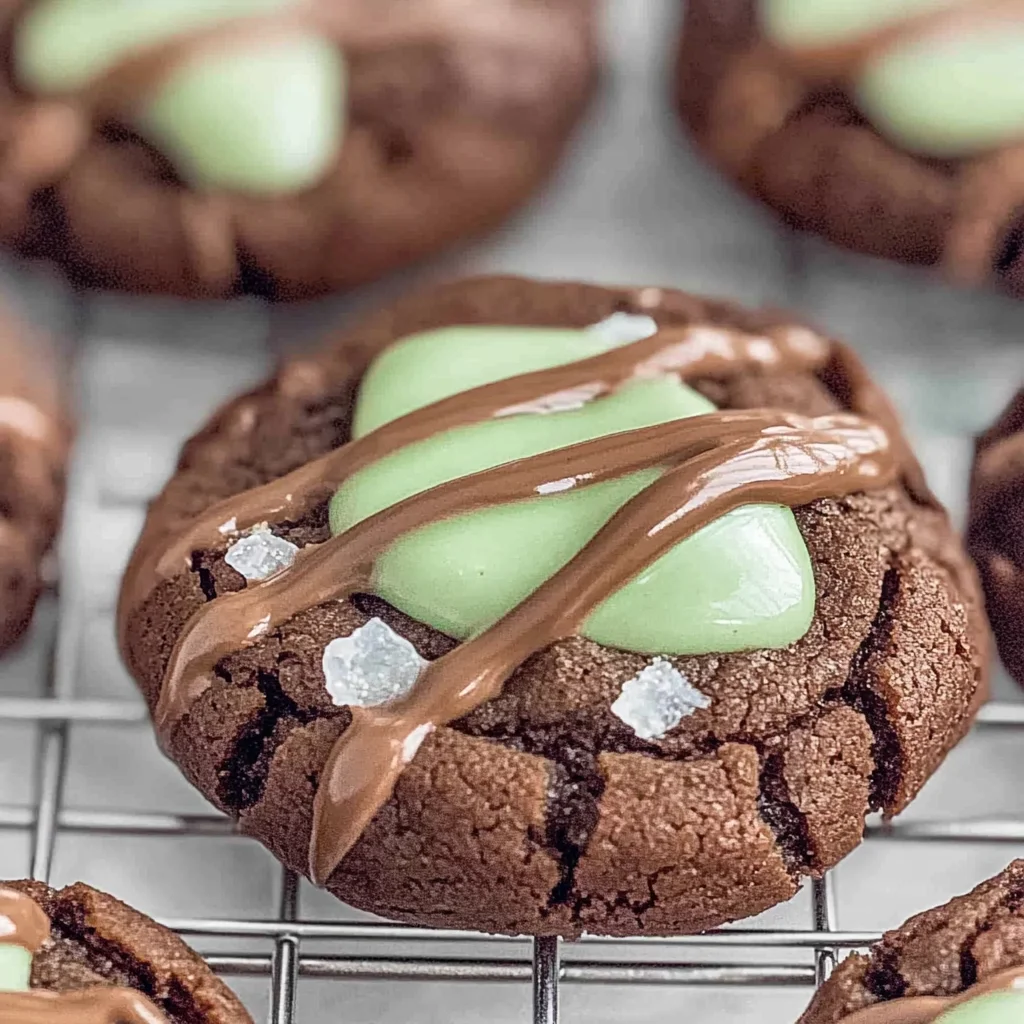
Chocolate Mint Thumbprint Cookies are a delightful twist on the classic cookie recipe. These cookies offer a soft, chewy texture with rich minty flavor that makes them perfect for any occasion. Whether it’s a holiday gathering, a birthday celebration, or simply a cozy night in, these cookies are sure to impress. Their unique combination of flavors and textures sets them apart from traditional cookies, making them a must-try treat for mint lovers.
Why You’ll Love This Recipe
- Irresistible Flavor: The combination of chocolate and mint creates a refreshing taste that is hard to resist.
- Easy to Make: This recipe is simple enough for bakers of all skill levels, ensuring everyone can enjoy homemade cookies.
- Customizable: You can easily adjust the mint flavor or add different fillings to suit your preferences.
- Perfect for Sharing: These cookies make excellent gifts or party treats, spreading joy wherever they go.
- Versatile Treat: Enjoy them with coffee, milk, or as an after-dinner dessert; they fit any moment.
Tools and Preparation
To create Chocolate Mint Thumbprint Cookies perfectly, having the right tools is essential. A well-prepared kitchen can streamline your baking process and enhance your results.
Essential Tools and Equipment
- Stand mixer or hand mixer
- Mixing bowls
- Baking sheets
- Parchment paper
- Cookie scoop
Importance of Each Tool
- Stand mixer or hand mixer: Helps achieve a creamy consistency when combining ingredients efficiently.
- Mixing bowls: Essential for keeping your ingredients organized and preventing mess during preparation.
- Baking sheets: Ensures even baking and easy transfer of cookies in and out of the oven.
Ingredients
To make these delightful Chocolate Mint Thumbprint Cookies, gather the following ingredients:
For the Cookies
- 1 cup unsalted butter
- 2 1/4 cups all-purpose flour
- 1 tablespoon cornstarch
- 1 teaspoon baking soda
- 1 teaspoon sea salt
- 1 cup firmly packed brown sugar
- 3/4 cup granulated sugar
- 1 large egg (room temperature)
- 1 large egg yolk (room temperature)
- 2 1/2 teaspoons vanilla extract
How to Make Chocolate Mint Thumbprint Cookies
Step 1: Prepare the Butter
Heat the butter in a heavy-bottomed saucepan until it melts completely. Allow it to darken slightly in color while caramelizing the milk solids. The aroma should be nutty and inviting.
Step 2: Cool the Butter
Allow the melted butter to cool down to room temperature before proceeding with the recipe. This step helps prevent cooking the eggs when added later.
Step 3: Combine Dry Ingredients
In a small bowl, mix together flour, cornstarch, baking soda, and sea salt. Set this mixture aside for later use.
Step 4: Cream Butter and Sugars
In your stand mixer or large bowl, beat together the cooled butter with both sugars until well combined. Expect this mixture to resemble wet sand.
Step 5: Add Eggs and Vanilla
Add one large egg, one egg yolk, and vanilla extract into the butter-sugar mixture. Beat well until everything is smoothly combined—this should take about 2-3 minutes.
Step 6: Incorporate Dry Ingredients
Gently stir in your dry ingredient mix until just combined. Be careful not to overmix; you want a cohesive dough without lumps.
Step 7: Chill the Dough
Chill your cookie dough for at least one hour but preferably between 24 to 72 hours. This resting time enhances flavor development significantly.
Step 8: Preheat Your Oven
While your dough chills, preheat your oven to 350°F (175°C). Line two baking sheets with parchment paper for easy cleanup.
Step 9: Portion Out Cookie Dough
Once chilled, scoop out portions of dough into balls and set them aside while preheating your oven completely.
Step 10: Bake Your Cookies
Place cookie dough balls on baking sheets spaced at least two inches apart. Bake in your preheated oven for about 8-10 minutes or until they turn golden brown.
Step 11: Cool Down
Allow cookies to rest on the baking sheet for about one to two minutes before transferring them onto a wire rack to cool completely. If desired, sprinkle with flaky sea salt while they’re still warm for an extra touch!
These Chocolate Mint Thumbprint Cookies are sure to become a favorite in your home! Enjoy every bite!
How to Serve Chocolate Mint Thumbprint Cookies
Chocolate Mint Thumbprint Cookies are a delightful treat that can be enjoyed in various ways. Whether you’re serving them at a gathering or indulging on your own, these cookies pair wonderfully with different accompaniments.
With a Glass of Milk
- A classic pairing! The creamy texture of milk complements the chewy cookies perfectly.
As Part of a Dessert Platter
- Arrange the cookies on a platter with other desserts like brownies and fruit tarts for an inviting dessert spread.
Topped with Whipped Cream
- Add a dollop of lightly sweetened whipped cream on top for an extra touch of indulgence.
With Ice Cream Sandwiches
- Sandwich a scoop of mint chocolate chip ice cream between two cookies for a decadent dessert experience.
Accompanied by Fresh Fruit
- Serve alongside fresh strawberries or raspberries to balance the sweetness of the cookies with some tartness.
At Coffee Breaks
- Pair with your favorite coffee or tea to enhance the flavors during your afternoon break.
How to Perfect Chocolate Mint Thumbprint Cookies
To achieve the best results when making Chocolate Mint Thumbprint Cookies, follow these helpful tips. They will enhance the flavor and texture, ensuring every batch is delicious.
-
Use Room Temperature Ingredients: Bringing butter and eggs to room temperature helps create a smoother batter and better texture in your cookies.
-
Chill the Dough: Allowing the dough to chill for at least an hour enhances flavors and helps prevent spreading during baking.
-
Measure Flour Accurately: Spoon flour into your measuring cup instead of scooping it directly. This prevents dense cookies caused by excess flour.
-
Don’t Overbake: Keep an eye on your cookies as they bake. Remove them from the oven when they are just golden around the edges for soft, chewy centers.
-
Add Extra Mint Flavor: For more minty goodness, consider mixing in peppermint extract along with vanilla or garnishing with crushed mint candies before baking.
Best Side Dishes for Chocolate Mint Thumbprint Cookies
When serving Chocolate Mint Thumbprint Cookies, consider adding some side dishes that complement their flavors. Here are some great options:
-
Fresh Fruit Salad: A mix of berries and citrus can brighten up your dessert table and balance out the sweetness of the cookies.
-
Chocolate Fondue: Melted chocolate served with fruits and marshmallows allows guests to dip their cookies for an interactive treat.
-
Coffee or Espresso: The rich flavors of coffee enhance the chocolate in the cookies and provide a nice contrast to their sweetness.
-
Mint Tea: A warm cup of mint tea can refresh your palate while echoing the minty notes in the cookies.
-
Cheese Board: Include mild cheeses like brie or gouda for a savory counterpoint to sweet treats.
-
Homemade Caramel Sauce: Drizzling caramel over each cookie adds an extra layer of flavor and richness that pairs well with chocolate and mint.
-
Yogurt Parfait: Layer yogurt with granola and fruit for a light option that complements cookie indulgence without overwhelming it.
-
Nut Mix: A small bowl of mixed nuts provides crunch and natural flavor contrasts to soften sweetness from desserts.
Common Mistakes to Avoid
Baking can be tricky, especially when it comes to cookies. Here are some common mistakes to avoid for perfect Chocolate Mint Thumbprint Cookies.
- Skipping Chilling Time: Not chilling the dough can lead to flat cookies. Always chill the dough for at least an hour to maintain shape.
- Not Measuring Ingredients Accurately: Using incorrect measurements can throw off the recipe. Use a kitchen scale or measuring cups for accuracy.
- Overmixing the Dough: Overmixing can make cookies tough. Mix until just combined for a soft and chewy texture.
- Ignoring Oven Temperature: Every oven is different; relying solely on time can result in undercooked or overcooked cookies. Always check with a toothpick if they are done.
- Using Old Ingredients: Expired baking soda or flour can affect the rise and texture. Always use fresh ingredients for the best results.
Storage & Reheating Instructions
Refrigerator Storage
- Store in an airtight container for up to 1 week.
- Layer with parchment paper to prevent sticking.
Freezing Chocolate Mint Thumbprint Cookies
- Freeze in an airtight container or freezer bag.
- Best consumed within 3 months.
Reheating Chocolate Mint Thumbprint Cookies
- Oven: Preheat to 350°F and heat for about 5 minutes until warmed through.
- Microwave: Heat individually on low power for about 10-15 seconds.
- Stovetop: Use a skillet on low heat, covering it for a few minutes until warmed.
Frequently Asked Questions
Here are some frequently asked questions about Chocolate Mint Thumbprint Cookies.
Can I customize the filling for my Chocolate Mint Thumbprint Cookies?
Absolutely! You can use any jam or chocolate spread you prefer as a filling.
How do I make my Chocolate Mint Thumbprint Cookies more minty?
Add extra mint extract or finely chopped fresh mint leaves into the dough for enhanced flavor.
What type of chocolate works best in Chocolate Mint Thumbprint Cookies?
Use high-quality dark chocolate or semi-sweet chocolate chips for a richer taste.
Can I substitute ingredients in this recipe?
Yes, feel free to substitute butter with coconut oil for a dairy-free option, or use gluten-free flour if needed.
Final Thoughts
Chocolate Mint Thumbprint Cookies are a delightful treat that combines rich chocolate flavors with refreshing mint. This versatile recipe allows you to customize your fillings and adjust sweetness levels according to your preference. Give it a try and enjoy these delicious cookies!
Chocolate Mint Thumbprint Cookies

Chocolate Mint Thumbprint Cookies are a delightful fusion of rich chocolate and refreshing mint, offering a chewy texture that melts in your mouth. These cookies are perfect for any occasion, whether it’s a festive gathering, a birthday celebration, or simply a cozy night at home. With their unique twist on classic thumbprint cookies, they are sure to impress both friends and family alike. Easy to make and fully customizable, you can adjust the mint flavor or add your favorite fillings to create a truly personalized treat. Serve them with milk or coffee for an indulgent experience that will leave everyone craving more!
- Prep Time: 20 minutes
- Cook Time: 10 minutes
- Total Time: 30 minutes
- Yield: Approximately 24 servings 1x
- Category: Dessert
- Method: Baking
- Cuisine: American
Ingredients
- 1 cup unsalted butter
- 2 1/4 cups all-purpose flour
- 1 tablespoon cornstarch
- 1 teaspoon baking soda
- 1 teaspoon sea salt
- 1 cup firmly packed brown sugar
- 3/4 cup granulated sugar
- 1 large egg (room temperature)
- 1 large egg yolk (room temperature)
- 2 1/2 teaspoons vanilla extract
Instructions
- Melt the butter in a saucepan until it caramelizes slightly, then let it cool to room temperature.
- In a bowl, mix together the flour, cornstarch, baking soda, and sea salt; set aside.
- Beat the cooled butter with both sugars until well combined.
- Add the egg, yolk, and vanilla; mix until smooth.
- Gradually fold in the dry ingredients until just combined.
- Chill the dough for at least one hour (preferably up to three days).
- Preheat your oven to 350°F (175°C) and line baking sheets with parchment paper.
- Scoop dough into balls and place on sheets with space in between.
- Bake for about 8-10 minutes until golden brown; let cool on racks.
Nutrition
- Serving Size: 1 cookie (30g)
- Calories: 150
- Sugar: 10g
- Sodium: 100mg
- Fat: 7g
- Saturated Fat: 4g
- Unsaturated Fat: 2g
- Trans Fat: 0g
- Carbohydrates: 20g
- Fiber: <1g
- Protein: 2g
- Cholesterol: 25mg


Leave a Comment